
 Have you ever thought you would like to have access to a beautiful classical labyrinth right in your own back yard or community? When researching how to do this for myself, I found a lot of different information, but not in one place. Therefore, I scoured the web and a couple of books and figured out how to do it. Then with lots of time, grace, logic, guessing and willpower, we designed and built this lovely labyrinth.
I will attempt to give you step-by-step instructions as to how we measured, planned and constructed our labyrinth along with helpful resources. However, the first thing to know is that creating a labyrinth was for us a spiritual practice from day one. I had the niggling idea that I wanted to build one for several years before I actually listened to that annoying voice in my head. Even then, it wasn’t until my partner and I visited the lovely pilgrim’s labyrinth in the Glendalough valley in Ireland that the voice of the labyrinth became too loud to be ignored. I truly felt that the labyrinth called itself into being, I just had to be willing to listen.
Every step of the way, we tried to ask the labyrinth what it wanted. When we got bogged down with figures or details, we would stop and ask the spirit of the labyrinth for help. When we got stuck in any part of the planning, we would ask for guidance, and new ideas always came. When we were constructing it in the Florida heat and bugs and we found ourselves arguing or grumpy, we would take a break and come back later, resolved that every step should be taken in peace and love.
I wish you many blessings in planning and building your own labyrinth. May you feel the fulfillment of creating a sacred place of your own, just as we de every day.
Research Stage

I suggest that anyone interested in building a labyrinth starts by learning how to draw one. Here is a link to a video that will help you learn How to Draw a 7-Circuit Labyrinth. This will help get the feel for what you are creating in your mind, heart and hands. I drew many, many labyrinths before I ever began planning my backyard labyrinth. It go to the point where I could trace the paths in my mind which gave me the feeling of really knowing what I was doing later.
The best resources I found for measuring and planning my design is: Make a Labyrinth with Tape
Even though it may not be how you want to construct your labyrinth, these helpful step-by-step instructions can help you determine how much space you need, how wide your paths should be and how to go about construction.
I also loved the book Exploring the Labyrinth : a Guide for Healing and Spiritual Growth by Melissa Gayle West. I kept re-checking it out of the library, so you may want to just go ahead and buy one! In addition to instructive information, the author offers prayers, blessings and creative ways to use a labyrinth on our spiritual path.
Planning Stage
Measure your area and decide how much space you have.
Decide how wide your paths will be
Decide how large you want your center to be
Decide what materials you will use to construct the paths and the borders
Supplies
- Marking rope: long enough to reach from the center point to the edge of the labyrinth
- Tent stake or post to mark center point
- 100 or so 4” nails (decking nails our other construction nails that can be left outside
- 100 or so Clothes pins or metal clip
- 200-300’ of rope
- 2 cans outdoor marking spray paint (bright orange or red)
- Wooden spacer cut to the width of your path
- Marker to measure depth of your border (if using paving stones)
- Edger
- Shovels, trowels, buckets for moving dirt, wheel barrow
Our specs:
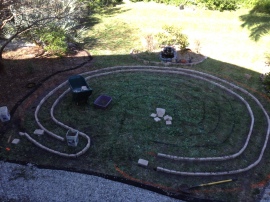
We decided to create our labyrinth using the lovely Florida grass and weeds already growing in our back yard. Yippee! For the border, we used paving stones that we stood up on their sides and then buried them halfway into the ground. We got 6” X 6” X 2” and 9”X 6” X 2” stones, which we buried 3” into the ground. Our paths were around 15” wide, with a 2” border. Our center is 4.5 feet across. Our calculations were based on the fact that we had a set space, which was 25’ across and 21’ deep.
 Step 1:
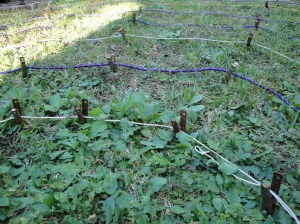
From the center, stretch the marking rope straight towards the top of the labyrinth and place a nail where each knot falls. Now move the marking rope a foot or two to the right, marking each knot with a nail. Do not move the marking rope too far as it will be harder to connect the nails later. Continue moving the marking rope and putting in nails until you are at 90-degrees from the center line. Then go back and do the other side. Follow the directions on the “Make a Labyrinth with Tape” link listed above for marking the two bottom half-circles in the same way. Be very careful to follow the directions! This part gets tricky.

Step 4:
When you have all the nails in place, clip one clip or clothes pin to each nail. Start at one “dead-end” and tie the end of one long rope to the clip. Thread the long rope through each clip or clothes pin. You have 4 dead-ends, so you will need to cut the rope and start at the other side once you come to the end of your first line.
At this point, we waited a while to make sure the labyrinth felt rigt in the right spot we had chosen. We left the ropes in place for several weeks, walking it often. We tweaked the places where it had gotten a little skewed during step 3. I encourage you to try this for yourself. It could save a lot of time later once you start construction.
Step 5:
When you are ready to move on, you will need your spacer. Go through each path and use the spacer to make sure your rope lines are as close to perfectly spaced as possible. Take up the rope in sections, and as you go, spray paint the grass, painting right over the nails. Once the spray paint dries, take up the nails, and you will have a painted labyrinth. How did you do? If it’s not perfect, don’t worry, you will be able to make small adjustments as you make the borders.


Step 6:
Now the hard work begins. Take this in small sections for the best results. Starting at one dead-end, use an edger to cut the sod along the line, cutting first on one edge of the spray-painted line, and then on the other. This worked out perfectly for our 2”-wide stones because the painted line was about 2″ wide. Come behind the edger, and using a flat shovel, remove the sod. Now take your hand trowel and begin to dig out the soil. Use the depth-measurer to dig out the soil to the correct depth.


For the remainder of the paths, use your spacer to measure the width of your paths as you go, making any necessary adjustments.


 Over Thanksgiving weekend 2 years ago, we spent a few humid days (it’s Florida after all) in our back yard finishing the construction of a beautiful 7-circuit labyrinth. In the years since, we have walked the labyrinth in prayer and meditation, enjoyed the aesthetic of its sacred geometry, and worked to make it a seamless addition to our garden, where native plants and wildlife flourish.


 Happy two-year anniversary labyrinth!


